Epoxy Finishes for Woodworkers: What I Actually Use and Why
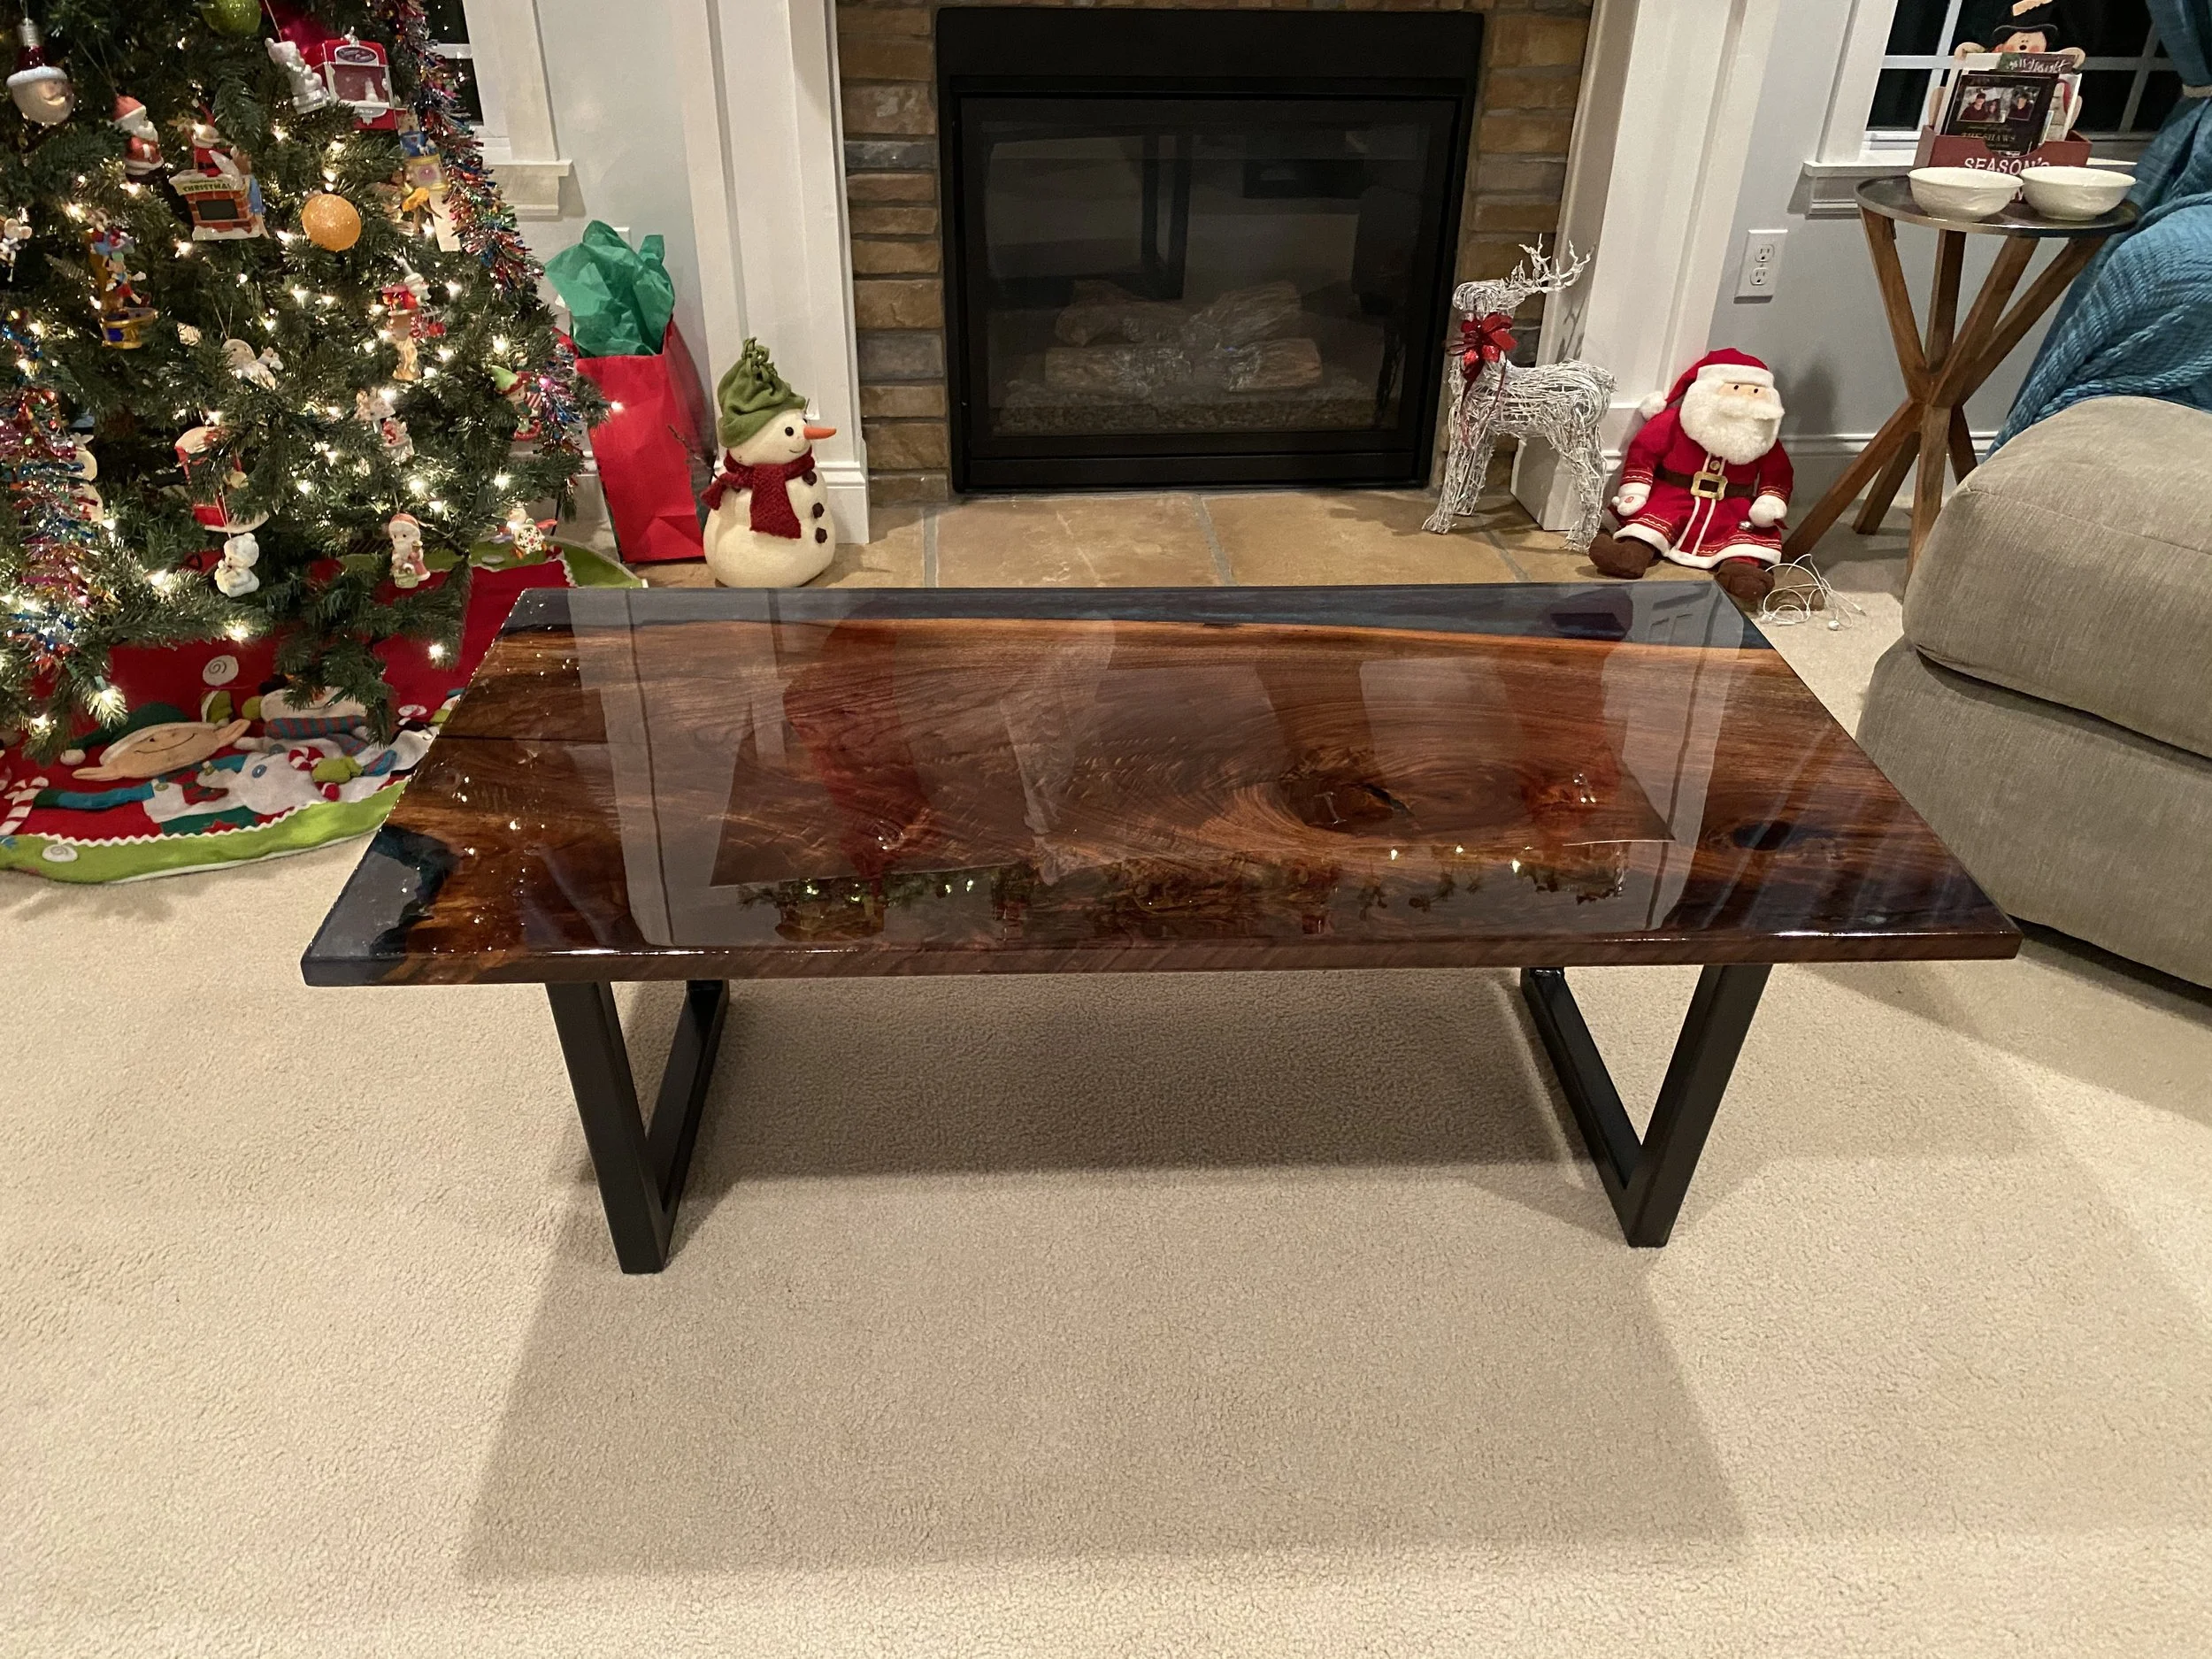
A full guide to epoxy types, application techniques, and the specific products I use in my shop. From river tables to bar tops, here’s when epoxy makes sense and how to get it right.
A Full Guide to Types, Applications, and the Products Worth Buying
Josh Shaw | Eternal Timber & Design | The Timber Room
Epoxy is one of those finishes that gets oversimplified in both directions. Half the internet treats it like liquid magic that fixes everything. The other half dismisses it as plastic coating for people who don't know how to use real finishes. The truth is somewhere in between, and it depends entirely on the application.
I've used epoxy on river tables, charcuterie boards, bar tops, knot fills, and crack repairs. I've also chosen not to use it on plenty of projects where a penetrating oil or hardwax finish was the better call. This post is about when epoxy makes sense, how to actually apply it without ruining your project, and the specific products I reach for when the job calls for it.
"Every finish has a job it's best at. Epoxy's job is protection, waterproofing, and filling voids. If that's what the project needs, nothing else comes close."
When Epoxy Is the Right Call (and When It Isn't)
Epoxy excels in a few specific situations. River tables are the obvious one. You're filling a void between two live-edge slabs, and there's simply no other finish that does that job. The epoxy becomes a structural element, not just a coating. I built a black walnut river table last year where the epoxy channel was about four inches wide and an inch and a half deep. That's not a job for polyurethane.
Deep blue metallic epoxy resin cherry coffee table in the wood shop
Bar tops and surfaces that take heavy use are another strong case. Epoxy creates a hard, waterproof, heat-resistant shell that holds up to condensation rings, spills, and the general abuse that a bar top sees on a Friday night. A penetrating oil finish on a commercial bar top would need re-oiling every few weeks.
Custom valet tray finished with Osmo Polyx-Oil in the shop
The charcuterie board I built for a local restaurant is a good example of a targeted epoxy application. The board itself is the centerpiece, a massive 2ft by 3ft white oak board, but it needed to handle hot serving dishes, aggressive cleaning and typical commercial kitchen abuse without scorching and be food safe. I used Stone Coat's Ultimate Top Coat for that one specifically because of its high heat tolerance. The board has been in regular service and the finish hasn't yellowed, cracked, or shown any heat damage, and most importantly, they love it.
Walnut burl board with black epoxy showing how epoxy stabilizes natural defects in wood
Where epoxy is not the right call: fine furniture where you want to feel the wood grain under your hand and see texture. A dining table, a jewelry box, a set of floating shelves. For those, I reach for Rubio Monocoat or Osmo Polyx-Oil every time. Epoxy gives you a glass-like surface. That's the point for a bar top. It's the wrong feel for a walnut credenza.
Types of Epoxy: Not All Resin Is the Same
This is where most people go wrong. They buy whatever gallon jug of epoxy shows up first on Amazon, pour it onto their project, and wonder why it yellowed in six months or cracked in the summer heat. Different formulations exist for different applications, and picking the right one matters.
Countertop and bar top epoxy is formulated for thin flood coats, usually 1/8" or less per layer. It's self-leveling, UV resistant, and designed to cure hard with good scratch resistance. Stone Coat's Clear Epoxy Resin Kit is what I use for this. It's food safe once cured, which matters if you're doing anything that touches food. (I know, I know...Im not a Total Boat fanboy...but wait)
Deep pour epoxy is a different formula entirely. It's designed to cure in thick layers (up to 2" or more depending on the brand) without generating excessive heat. Regular countertop epoxy poured two inches deep will exotherm, crack, and potentially warp your workpiece. If you're filling a river table channel or a deep void, you need a deep pour formula. Find one you trust, Total Boat and Stone Coat make great products and they are both credible brands in that space. I keep TotalBoat's ThickSet Deep Pour on the shelf for exactly this.
Top coat epoxy is what goes over a cured base layer for additional protection. Stone Coat's Ultimate Top Coat adds extra scratch resistance, UV protection, and heat tolerance over the base pour. I use it on anything that's going to see daily use, especially the food-service pieces like the 3 Stone board. But it's a textured finish, I like that look.
Art coat epoxy has an extended working time and is designed for decorative techniques like alcohol ink, acrylic swirls, and pigmented pours. Stone Coat's Art Coat has zero VOCs, good UV resistance, and a longer open time so you can manipulate the design before it starts to set.
Geometric green epoxy resin serving board for Westmoreland Museum
How I Actually Apply Epoxy (Step by Step)
Surface prep is where epoxy projects succeed or fail. The wood needs to be sanded to at least 220 grit, completely free of dust, and sealed with a thin seal coat before the flood coat. I cannot overstate this. If you skip the seal coat, the wood will off-gas air bubbles into your flood coat for hours, and you'll spend the entire cure time chasing them with a torch.
The seal coat is a thin layer of the same epoxy, brushed on and allowed to cure. I thin mine with just a touch, and I mean a touch of acetone (a lot of these products are thin enough now for this application). This is very important for "punky" or burled woods that have some natural rot. It penetrates the grain, seals the pores, and gives the flood coat a smooth, non-porous surface to bond to. I let the seal coat cure for four to six hours before the flood coat, depending on shop temperature.
Mixing is where accuracy matters. Epoxy is a two-part system, and the ratio needs to be exact. Most countertop epoxies are 1:1 by volume. I use graduated mixing cups and measure carefully. Under-catalyzed epoxy stays tacky forever. Over-catalyzed epoxy cures too fast, generates heat, and can crack (or melt your plastic containers if you wait too long). Neither is fixable without stripping the entire surface and starting over.
Pour temperature matters more than most people realize. Epoxy wants to be mixed and poured between 70°F and 80°F. Below 65°F, it gets viscous and doesn't self-level properly. Above 85°F, it cures too fast and you lose working time or it can get hazy. I keep a space heater in the shop during winter pours and work early morning in the summer.
Bubble removal happens in two passes. The first pass is immediately after pouring, using a propane torch held six to eight inches above the surface. Quick, sweeping passes. The heat thins the epoxy at the surface and lets trapped air escape. Second pass is 20 to 30 minutes later, catching any bubbles that migrated up from the seal coat interface. A Bernzomatic TS4000 with trigger start is what I use. One hand on the torch, one hand rotating the piece if it's small enough. I may revisit it later and hit it again after 2am...
Blue epoxy resin being poured into a river board mold in the wood shop
Cure time is 24 hours for light handling, 72 hours for full cure, and I give it a full week before putting anything on it that might scratch. If you're applying a top coat, wait the full 72 hours before the second pour.
The Mistakes That Ruin Epoxy Projects
Skipping the seal coat. I mentioned it above, but it's worth repeating because it's the single most common failure I see. Air trapped in end grain and pores will bubble through your flood coat for hours. The seal coat eliminates this almost entirely.
Pouring too thick with the wrong formula. Countertop epoxy poured more than 1/4" in a single layer will exotherm and it gets HOT!. The curing reaction generates heat, and thick pours trap that heat, which accelerates the reaction, which generates more heat. The result is cracking, yellowing, or warping and in some cases, burns your shop down. Use deep pour epoxy for anything over 1/4 -1/2".
Not wearing gloves. Epoxy is a sensitizer. Repeated skin contact can develop into a permanent allergic reaction where you can't be around uncured epoxy at all. Nitrile gloves, every single time. Not optional. And it's a pain to get off your hands.
Working in a dusty shop. Epoxy takes hours to cure, and it's a magnet for airborne dust, pet hair, and whatever else is floating around. I do epoxy pours after a thorough shop cleaning and I tent the piece with a cardboard enclosure or plastic sheeting to keep debris out while it cures. My shop is shut down while curing, no exceptions...I don't even open the door.
Rushing between coats. If you apply a top coat before the base is fully cured, you get adhesion problems, fish eyes, or cloudiness. 72 hours minimum between pours. I know it's annoying. It's less annoying than stripping and re-pouring. Hit it with a light sanding if bonding is an issue.
Epoxy vs. Other Finishes: When I Use What
I'm not an epoxy-on-everything guy. Most of my furniture gets Rubio Monocoat or Osmo Polyx-Oil because I want the person using it to feel the wood, not a plastic shell. Here's how I think about it.
Epoxy: river tables, bar tops, commercial surfaces, food-service boards that need heat protection, void fills, crack repairs, and any project where waterproofing and impact resistance matter more than wood feel.
Rubio Monocoat: dining tables, desks, credenzas, shelving, anything where you want a matte, natural feel that enhances the grain without building a film. One coat and done. Repairs are dead simple because you just re-oil the damaged area.
Osmo Polyx-Oil: similar applications to Rubio but with a slightly different sheen and feel. I tend to use Osmo on lighter woods like maple and ash where I want a bit more warmth in the finish.
Polyurethane: I rarely use it anymore. It builds a film, yellows over time, and repairs require sanding the entire surface multiple times between coats. Epoxy does everything poly does but better for thick-film applications, and Rubio or Osmo beats it for thin-film applications.
Epoxy top coat being poured on a three-stone commercial charcuterie board
Products Referenced in This Post
🛒 Stone Coat Countertops Clear Epoxy Resin Kit (1 Gal)
The base epoxy I use for countertops and bar tops. UV, scratch, and heat resistant, food safe, and self-leveling. One gallon covers roughly 12 square feet at 1/8" thick.
🛒 Stone Coat Countertops Ultimate Top Coat Epoxy (Glossy)
This is what I used on the 3 Stone charcuterie board. Extra scratch resistance, UV protection, and high heat tolerance. If the piece is going near food or hot dishes, this is the top coat you want.
🛒 Stone Coat Countertops Art Coat (1 Gal)
Formulated for alcohol ink, acrylic, and decorative pours with zero VOCs and extended working time. If you are doing artistic or colored epoxy work, this is the one to reach for.
🛒 TotalBoat Table Top Epoxy (1 Gal Kit)
If you want an alternative to Stone Coat for countertop and bar top work, TotalBoat's table top formula is a solid option. Self-leveling, UV resistant, and cures crystal clear. I've used both brands and they each perform well.
🛒 TotalBoat ThickSet Deep Pour Epoxy (1 Gal Kit)
For river tables and deep void fills where you need to pour 2" or more in a single layer. Low exotherm, long working time, and cures clear. This is the deep pour formula I reach for when Stone Coat's isn't on the shelf.
🛒 Bernzomatic TS4000 Trigger Start Torch
Quick passes with a propane torch are the fastest way to pop bubbles after a pour. The trigger start means one-handed operation while your other hand holds the workpiece steady.
🛒 Custom Shop Graduated Paint Mixing Cups (Box of 100)
Accurate ratio mixing is everything with epoxy. Graduated markings on both sides, sturdy enough to stir without flexing. I go through a box every few months.
🛒 Stone Coat Countertops 1-Quart Mixing Cups (10-Pack)
For smaller pours and seal coats where a full quart cup is the right size. Graduated markings, reusable if you let the epoxy cure and pop it out. I keep these on the bench for quick mix jobs.
🛒 Gloveworks Black Nitrile Gloves (Box of 100)
Epoxy will bond to your skin and it is a miserable experience removing it. Nitrile, not latex. Keep a box next to your epoxy station and use a fresh pair every pour.
🛒 Birch Wood Stir Sticks (100 Pack)
You need something to stir with that won't flex or shed fibers into your mix. Birch stir sticks are cheap, stiff, and disposable. I grab a fresh one for every batch and toss it when I'm done.
Affiliate Disclosure: This post contains affiliate links. If you purchase through these links, I may earn a small commission at no extra cost to you. I only recommend products I've used in my own shop. All opinions are my own.